Delta Flyer Refit - Wiring Reference
1. Notes
Klipper Compatibility
The klipper-section of this tutorial is a general guide to installing Klipper on the BTT DZ01, and can be used for pretty much any printer using that board, not just the Flyer.
Board Compatibility
The config files used are specifically for the LDO Delta Flyer kit using a BTT DZ01, if you are using a different board, the config files will not work, but the macros should work on any Flyer setup.
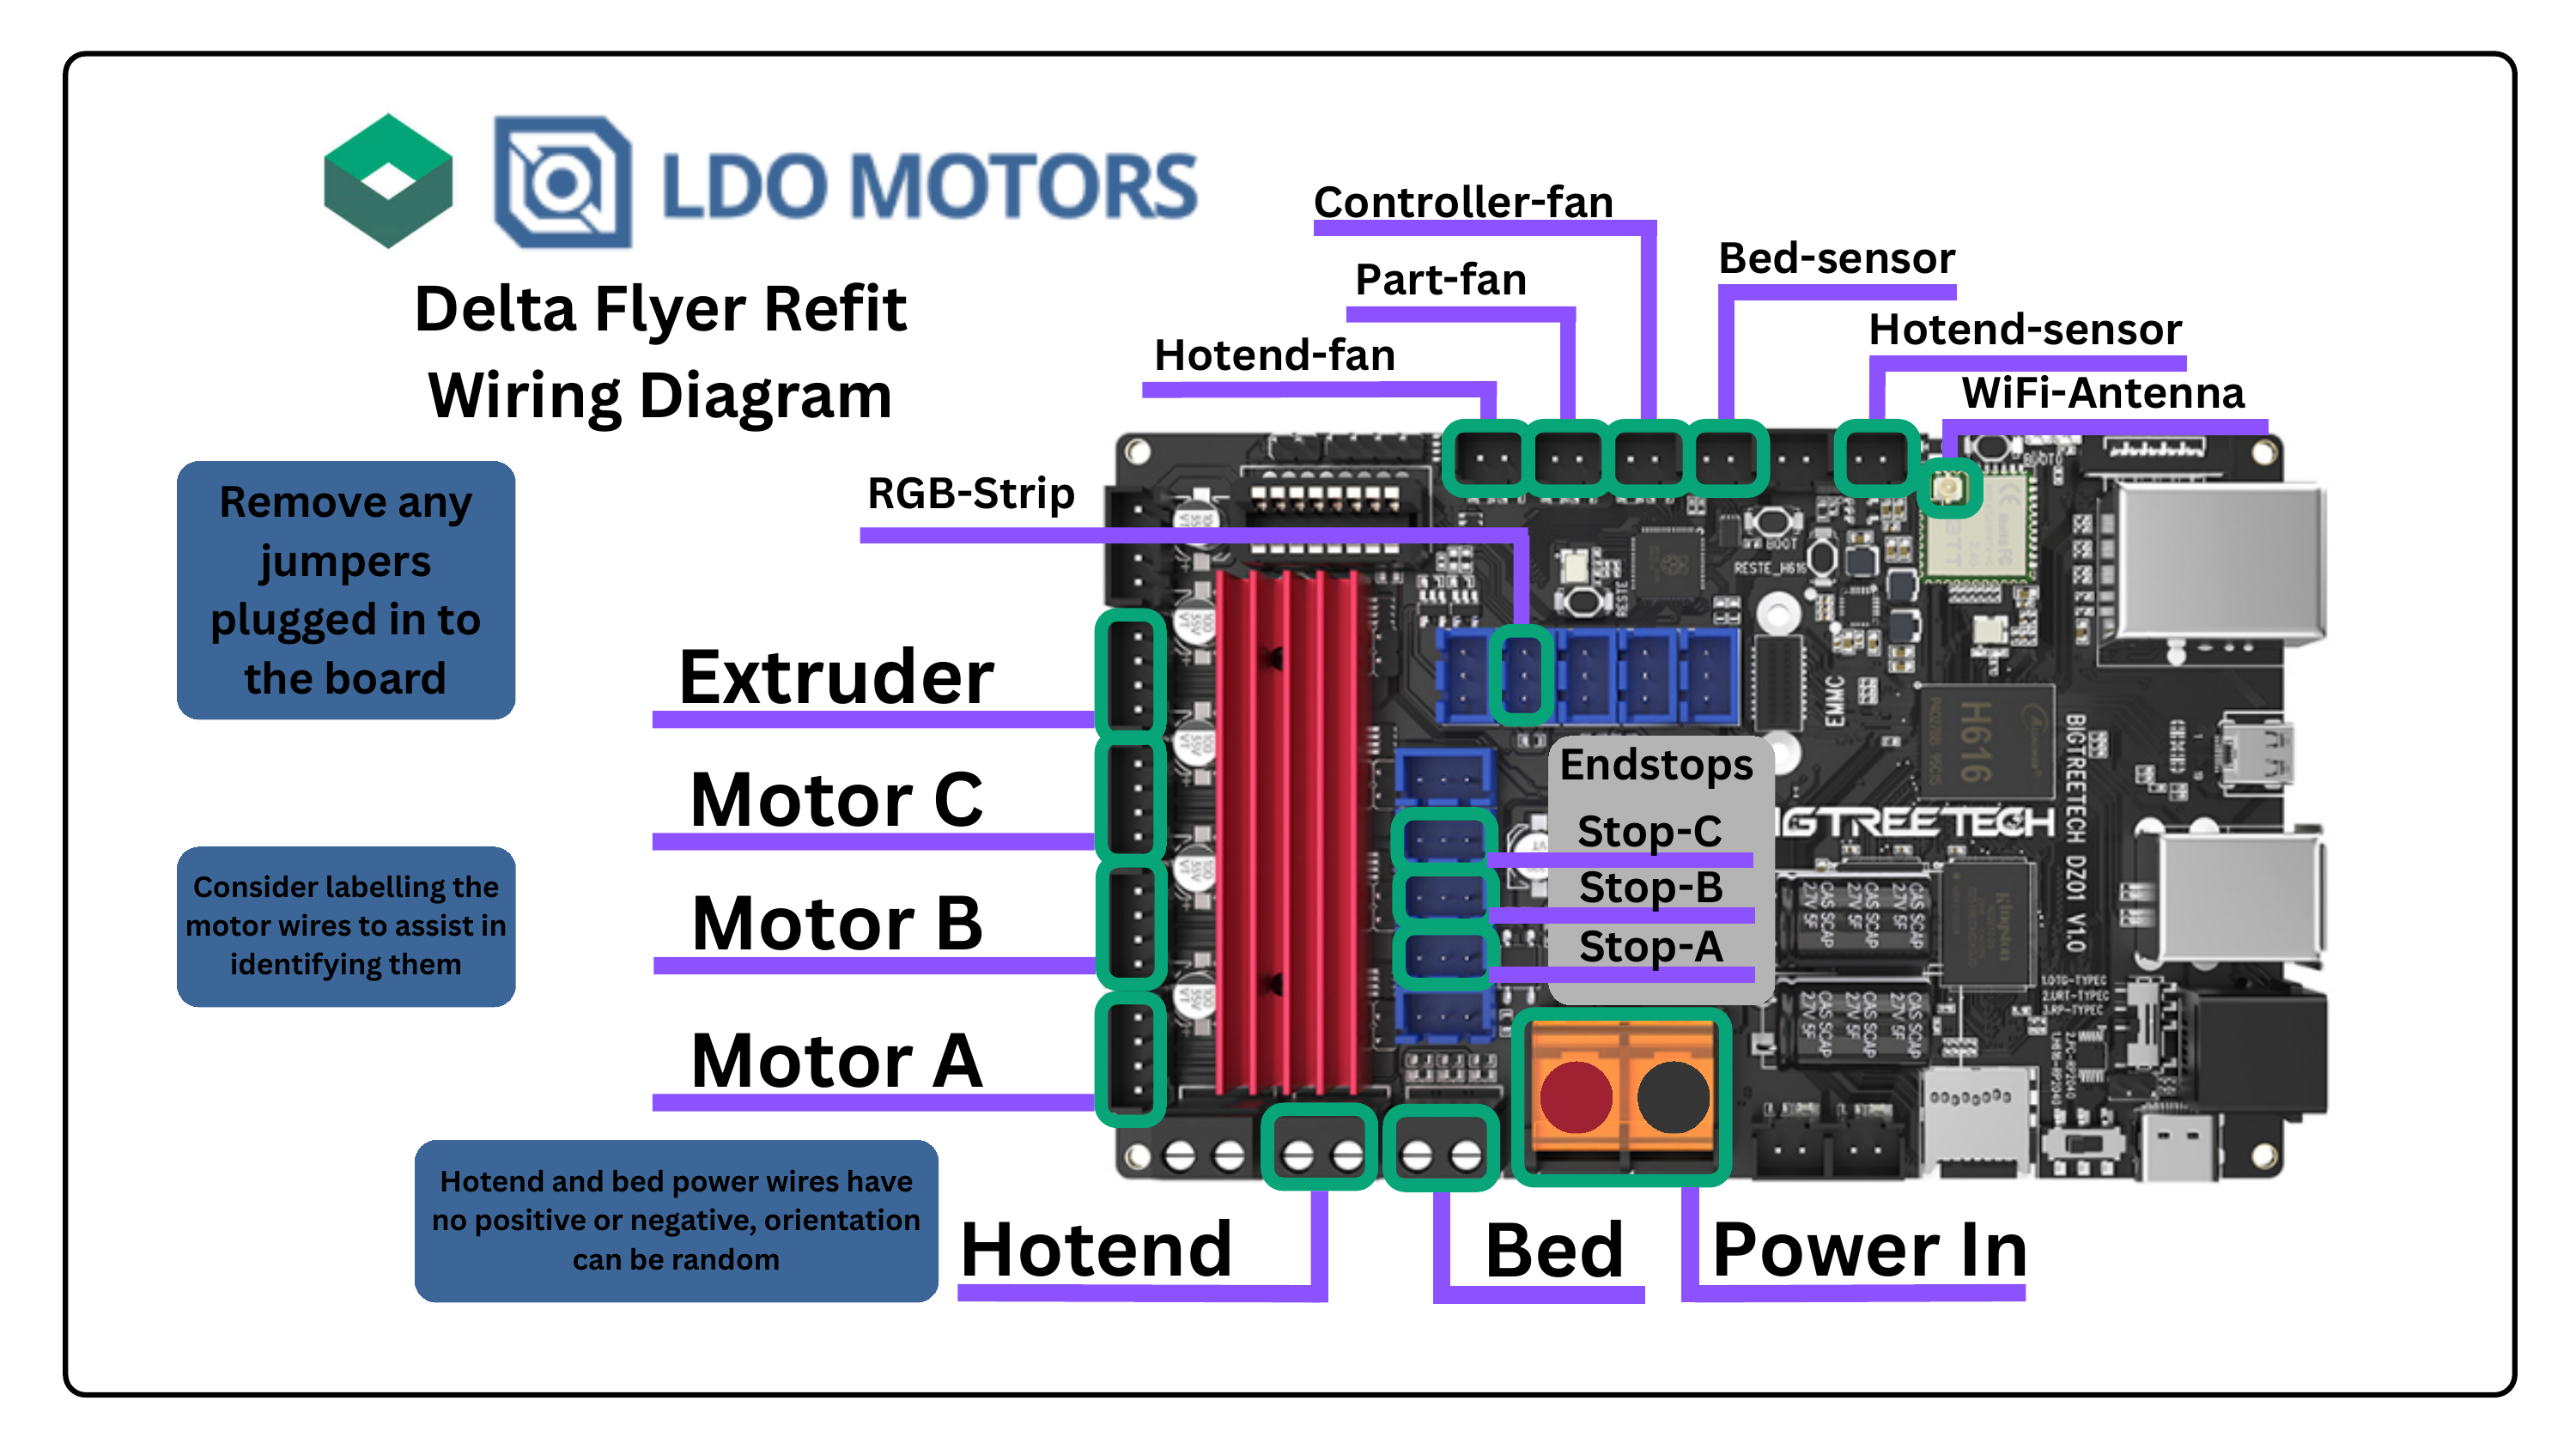
Jumpers and switches
The BTT DZ01 comes preinstalled with some jumpers on the board. Remove ALL OF THEM before powering on the printer. Make sure the switches on the board are in the "OTG-TYPEC" and "H616-RP2040" positions. The board might not function properly if these are set wrong.
2. Step-by-Step Process/Content
To complete this tutorial, we need Balena Etcher or another Imaging tool like pi imager or Win32DiskImager. I won't cover installing these, but it should be pretty straight forward.
To find our device on the network, I'll be using a software called "Angry IP Scanner", they have a portable version that wont need to be installed on your computer, let's download that.
Next we need the image to put on the micro SD going into the CB1, this can be downloaded from Bigtreetech's Github, I recommend getting the larger of the two versions.
To slice our 3D models for printing, we will be using Orcaslicer. You can download the latest build from their github.
Finally, we are going to download the config bundle from the Kanrog Creations Github, ready to transfer over to our Flyer.
Unzip the CB1 imagefile
Insert the micro SD card into your computer, open Balena Etcher(or another imaging tool of your choice), select the CB1 image we downloaded, Select the micro SD card as a target and press "Flash!". This will take a few minutes.
Next, pull the SD card out and put it back into the computer, navigate to it in the file explorer and find the file called system.cfg, and open it in a text-editor.
WiFi Configuration
In this file, find the "WIFI_SSID" line and add your wifi-SSID, next, go to the "WIFI_PASSWD" line and enter your Wifi's password, make sure to keep the apostrophes. Then save and close this file, pull the SD from your computer, and put it into the microSD slot on the M4P. Remember, the CB1 can only connect to 2.4GHz Wifi.
You should end up with something like this:
## wifi name
WIFI_SSID="Your SSID"
## wifi password
WIFI_PASSWD="Your Password"
We can also set a custom name for this printer on the network by changing the line at the top that says: "#hostname="BTT-CB1"" into "hostname="DELTA-FLYER""
Important Note
(Remember to uncomment the line by removing the "#") Any name works, avoid spaces. Remember to save.
Remove the SD card and insert it into the BTT DZ01.
Now we are ready to power up the printer for the first time! Just take a minute and make sure you don't have any loose wires and that everything is connected somewhere.
Boot up the printer and give it a little time to do its initial boot, this takes longer the first time, normally not longer than 5-10 minutes.
After the printer has booted up, we need to find the IP of the printer, there are a couple ways to do that, usually by logging in to your wifi-router, but this is different depending on what router you have, so I will be using a different method; the Angry IP scanner we downloaded earlier.
Open the ipscan_win64-xx.exe we downloaded earlier and hit "Start". Let it finish the scan, and when it's done, it will give you a prompt saying "Scanning Complete". Click close.
Now we can sort the list by "Hostname" and look for our CB1, it should show up as the name you set earlier in the list. If not, look for an IP using the port "80". Now we have the IP for our printer!
To make sure everything is working, let's open this IP in a browser and see if we can connect to the printer that way first.
While we are in here, let's do some cleanup and get ready to transfer the config files. Go to the "Machine" tab and press the "Create Directory" icon. Let's call this folder "Old" because we are going to put all the files that we don't need in here.
Now, lets move some files into this folder by simply dragging them in, lets move the [printer.cfg] and [print_area_bed_mesh.cfg] files. We do this mostly as a good habit. There's nothing worse than deleting something and realizing you need it later.
After clearing up some space, we can open the config bundle in a file explorer and drag the printer.cfg into the mainsail browser-window, this will copy it onto our printer.
Press "Save and Restart" at the top of the window and then power cycle the printer.
Success!
Your printer should now be up and running!
Config file note:
Make sure you read trough the config file, there is a lot of usefull information in there,
I've included a set of macros that will help you get going. If you are like me, you can sort them to make things a little more organized.
Lets get the delta motion system calibrated; Press the macro called "ENDSTOPS CALIBRATION". The printer will home itself and start the built in endstop calibration tool, After it is done, press the "SAVE AND RESTART" button at the top of the screen.
Now we will make sure the effector (toolhead) moves parallel to the bed using the good old paper method. Press the "DELTA CALIBRATE MANUAL" macro and use the on-screen tool that pops up to adjust each of the 7 points on the bed. To do this, place a piece of paper between the nozzle and the bed and slowly lower the toolhead using the "-" button until you feel resistance on the paper. Now fine tune it so that you can move the paper, but still have a little resistance and press "ACCEPT" when you are happy. Repeat until the tool is complete. (the amount of resistance isn't important, just make sure it's the same amount across all points)
After it is done, press the "SAVE AND RESTART" button at the top of the screen.
Important Note
During this process, if the printer skips at any point, you have to restart the procedure!
We want to calibrate our heaters. To do this, simply use the respective macros, "PID HOTEND" and "PID HEATBED". The printer will save and restart after each of them. This will take a while.
Install and open Orcaslicer. (Needs to be V2.3.1 or newer)
In the window that appears, press "Get started" and find the RolohaunDesign Delta Flyer, select 0.4 nozzle (if you have a stock setup) and press "Next".
In the next window, we can select the filament types we want to have available. The Delta Flyer can print PLA, PETG, ABS, TPU and PC. Press "Next".
Enable stealth mode and press "Next".
Enable "Install Bambu Network plug-in" and press "Next". Let it install and click "close".
Navigate to the "Prepare" tab, press the little Wifi button next to the name of the printer, find the "Hostname" box and enter the IP used to open Mainsail in your browser, press "enter" and "Test" to make sure the connection works. Give your printer a name at the top and press "OK".
Connected!
You now have access to mainsail directly in the slicer in the "Device" tab!
For our first print, we are going to do a Z-offset fine tune, as well as check our leveling.
To do this, Right click the build-area in OrcaSlicer, navigate to "Add Primitive" -> "Cylinder".
With the cylinder selected, press the "Scale" tool on the top toolbar and uncheck "Uniform scale", enter 80,80 and 0.2 in the "size" boxes.
At the top bar, press "Slice plate"
Insert filament into the extruder, navigate to the "Device" tab, and press the "Load Filament" macro, this should pull the filament all the way to the hotend.
Back in the "Preview" tab in OrcaSlicer, press "Print" followed by "Upload and Print" This will send the file to your printer and automatically start the print.
Go to the "Device" tab again and make sure your printer is heating up and getting ready to print.
When the print starts, use the "Z-Offset" tool in the "Toolhead" window to adjust the height of your hotend to the bed until you have a nice and smooth first layer, with no gaps between the lines.
Repeat the print if needed. When the first layer looks good, press "SAVE"(in the z-offset window) and "SAVE CONFIG".
You are now ready for your first ACTUAL print. I recommend downloading the "Rolo Cube" from Printables and print as your first print. It's a good way to ensure your printer works as it should, and is a great opportunity to make a short little video to upload to Youtube for your serial application!
Calibrate extruder
If the print looks a little off you might want to calibrate your extruder. Check out how to do that HERE
3. Recap & Conclusion
🎉 Congratulations!
If you have any issues during the setup, please reach out to us on the Rolohaun discord.
Join Rolohaun DiscordAt this point, you have a printer you can enjoy, print what your heart desires!
4. Troubleshooting
Step-by-Step Instructions
1. Connect to Your Printer
- On Windows, open Command Prompt
- Type: ssh biqu@PRINTER-IP (replace PRINTER-IP with your actual printer IP address)
- Press ENTER
- When prompted for a password, type: biqu
- Press ENTER
2. Open the Configuration File
- Type: sudo nano ./klipper/klippy/mcu.py
- Press ENTER to open the text editor
3. Find and Edit the Timeout Value
- Use the Down Arrow key to scroll down
- Find the line: TRSYNC_TIMEOUT = 0.025
- Change it to: TRSYNC_TIMEOUT = 0.050
4. Save Your Changes
- Press CTRL + X
- Press Y
- Press ENTER
5. Reboot the Printer
- Type: sudo reboot now
- Press ENTER
- The printer will reboot automatically
Result
The error should be resolved after the reboot completes.
Credit
Thanks to @__esm__ on Discord for this solution!
⚠️ Update
This will create a "Repo is dirty." warning in the Machine tab, ignore this.
You might have to re-do this if you update klipper.
Return to Delta Flyer Refit
Ready to explore more resources and configuration files?
← Back to Main Site